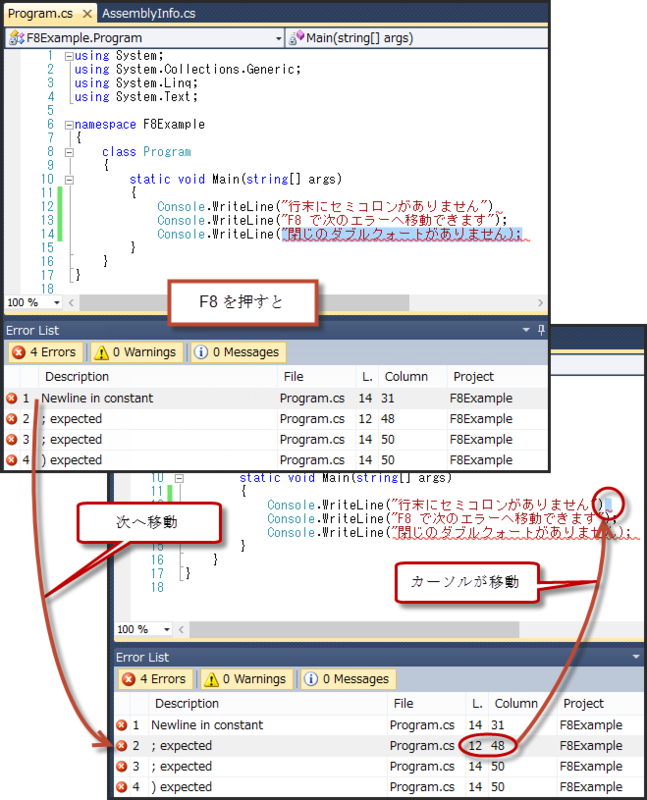
Visual Studio の F8 で次の項目に移動できる。
- Error List
- Find Results
- Find Symbol Results で、
F8 を押すと、
- これらのウインドウの選択項目が次へ移動し、
- コードエディタでは対応する行にカーソルが移動
します。とっても便利!

DataGridView のあるセルの境界線スタイルを変更する
DataGridView のあるセルの境界線スタイルを変更するには、
- CellPainting イベント で、
- 変更したいセルの AdvancedBorderStyle を設定する。
次のプログラムは、セル (1, 1) の境界線を DataGridViewAdvancedCellBorderStyle.InsetDouble に設定する。e.AdvancedBorderStyle で、Top と Left は設定した内容が表示されたが、Bottom と Right は表示されなかった。そのため、下のセルと次のセルの Top と Left を設定した。
using System;
using System.Windows.Forms;

namespace DataGridViewCellBoundary3
{
    public partial class Form1 : Form
    {
        public Form1()
        {
            InitializeComponent();
        }

        private void Form1_Load(object sender, EventArgs e)
        {
            dataGridView1.Columns.Add("Column 1", "Column 1");
            dataGridView1.Columns.Add("Column 2", "Column 2");
            dataGridView1.Columns.Add("Column 3", "Column 3");

            dataGridView1.Rows.Add();
            dataGridView1.Rows.Add();
            dataGridView1.Rows.Add();
        }

        private void dataGridView1_CellPainting(object sender, DataGridViewCellPaintingEventArgs e)
        {
            if (e.ColumnIndex == 1 && e.RowIndex == 1)
            {
                e.AdvancedBorderStyle.Top = DataGridViewAdvancedCellBorderStyle.InsetDouble;
                e.AdvancedBorderStyle.Left = DataGridViewAdvancedCellBorderStyle.InsetDouble;
            }
            if (e.ColumnIndex == 2 && e.RowIndex == 1)
            {
                e.AdvancedBorderStyle.Left = DataGridViewAdvancedCellBorderStyle.InsetDouble;
            }
            if (e.ColumnIndex == 1 && e.RowIndex == 2)
            {
                e.AdvancedBorderStyle.Top = DataGridViewAdvancedCellBorderStyle.InsetDouble;
            }
        }
    }
}

UserControl のキャプション用ラベル
UserControl のキャプションとして使うラベル。
- 親コントロール内にフォーカスがあるかないかで、背景色を変える。
- 背景色は、グラデーションで表示する。
using System;
using System.Drawing;
using System.Drawing.Drawing2D;
using System.Windows.Forms;

namespace HeaderedContent
{
    internal class CaptionLabel : Label
    {
        private const LinearGradientMode GradientMode = LinearGradientMode.Horizontal;

        private Color StartColor
        {
            get
            {
                if (Parent.ContainsFocus)
                {
                    return SystemColors.GradientActiveCaption;
                }
                else
                {
                    return SystemColors.GradientInactiveCaption;
                }
            }
        }

        private Color EndColor
        {
            get
            {
                if (Parent.ContainsFocus)
                {
                    return SystemColors.ActiveCaption;
                }
                else
                {
                    return SystemColors.InactiveCaption;
                }
            }
        }

        protected override void OnPaintBackground(PaintEventArgs pevent)
        {
            Graphics g = pevent.Graphics;
            Rectangle rect = new Rectangle(0, 0, Width, Height);

            using (var brush = new LinearGradientBrush(rect, StartColor, EndColor, GradientMode))
            {
                g.FillRectangle(brush, rect);
            }
        }
    }
}
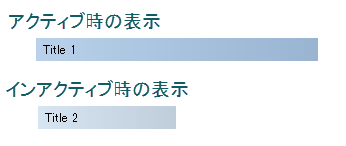
表示はこんなふうになる。

TextBox のサイズを内容に応じて設定する
TextBox のサイズを内容に応じて設定するには、TextRenderer クラスの MeasureText メソッドで表示サイズを計算し、その値を TextBox に設定する。
TextBox のサイズは境界を含んでいる。そのため BorderStyle が None 以外の場合、計算したサイズをそのまま設定すると、テキストが入りきらないことがある。
using System;
using System.Windows.Forms;

namespace AutoSizeTextBox
{
    public partial class Form1 : Form
    {
        public Form1()
        {
            InitializeComponent();
        }

        private void Form1_Load(object sender, EventArgs e)
        {
            textBox1.Multiline = true;
            textBox1.BorderStyle = BorderStyle.None;
            textBox1.AppendText(
                "TextBox のサイズを内容に応じて設定するには、" + Environment.NewLine +
                "TextRenderer.MeasureText で" + Environment.NewLine +
                "表示サイズを計算し、" + Environment.NewLine +
                "その値を TextBox に設定する。");
            textBox1.Size = TextRenderer.MeasureText(textBox1.Text, textBox1.Font);
        }
    }
}

シリアライズ LOB パターン
データベースに関連が複雑なオブジェクトを保存するときに使用するパターン。参照: P of EAA: Serialized LOB
たとえば、あるオブジェクトが個数が可変のオブジェクトを保持する場合、普通にデータベースのテーブルに保存しようとすると、
- データベースに、それぞれのオブジェクトのクラスごとのテーブルを作成し、
- キーを用いてオブジェクト間の参照を保持し、
- プログラムで、オブジェクトの追加・更新・削除を追跡し、
- それをデータベースに反映させる。
という処理が必要になる。
シリアライズ LOB パターンを使うと、
だけになる。
利点と欠点は、以下の通り。
Visual Studio の Document Outline ウインドウ
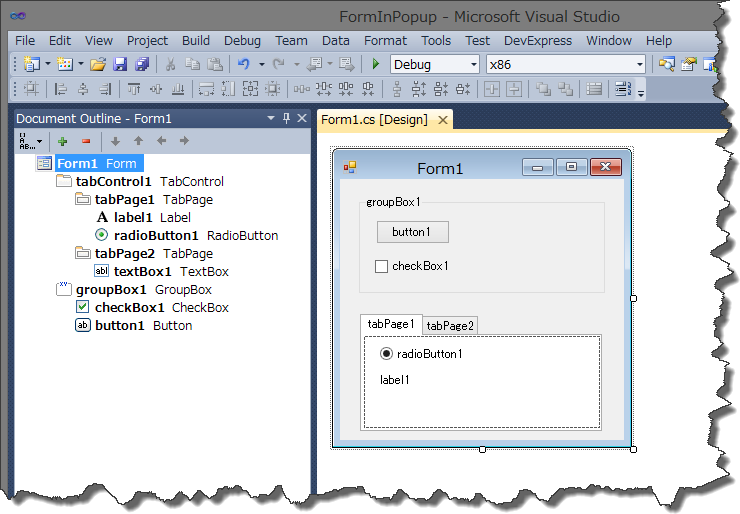
フォームをデザイナーで作成するとき、Document Outline ウインドウが便利。
- フォーム内のコントロールの構造が表示される。
- クリックするとそのコントロールがデザイナで選択される。

Document Outline ウインドウは、メニューの "View -> Other Windows -> Document Outline" で開く。

ポップアップから続けてポップアップを表示する
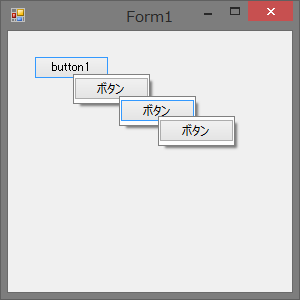
tt195361.hatenablog.comで表示したポップアップからさらにポップアップを表示すると、もともと表示していたポップアップが閉じてしまう。これを閉じないようにするには ToolStripDropDown.OwnerItem プロパティ を設定する。
次のプログラムでは、ポップアップ中のボタンのクリックイベントで、親のポップアップの ToolStripControlHost が子供 PopupPanel の OwnerItem プロパティに設定されるようにしている。
using System;
using System.Windows.Forms;

namespace CascadingPopup
{
    public partial class Form1 : Form
    {
        public Form1()
        {
            InitializeComponent();
        }

        private void button1_Click(object sender, EventArgs e)
        {
            ShowPopup(null);
        }

        private void ShowPopup(ToolStripItem ownerItem)
        {
            var button = new Button();
            button.Text = "ボタン";
            var controlHost = new ToolStripControlHost(button);
            button.Click += (sender, e) => ShowPopup(controlHost);
            var popupPanel = new ToolStripDropDown();
            popupPanel.OwnerItem = ownerItem;
            popupPanel.Items.Add(controlHost);
            popupPanel.Show(Cursor.Position);
        }
    }
}
